8" and 9" Installation Instructions

Click images to enlarge
×
Additional Parts list needed for installation: Part numbers are for parts store not dealer. (Included in complete kit.)
- Brackets from NRC
- Rotors-2 needed [# 54017 (2) 94 up Mustang]
- Soft lines from caliper to housing (1 each) [10mm bango on caliper end to 3/16" inverted flare on housing end]
- Calipers SN-95 loaded (1 each) [#4545 and #4544 94 to 04 Mustang]
- Optional equipment
- Dust Shields-2 needed (Dealer item) [#F4ZZ 2C028A Really a splash guard]
Remember to work safely!
- Place vehicle securely on jack stands prior to starting disassembly.
- In order to install the NRC brackets, the bearing and retainer must be removed. We recommend new bearings, as they are cheap ($12 each). This requires a PRESS. Most front end shops have a press or likely one of your buddies has one.
- Remove drums, rotate axles and remove the bolts holding the retaining plate from housing and remove the axles, save the T bolts they will be reused. Remove E brake cable. Remove brake line and then remove the entire backing plate. Remember, save the mounting bolts they will be reused.
- The brackets are marked left to right and they mount the caliper to the rear of the center line and inboard. Before PAINTING or putting the bracket on the axles, test fit the bracket to the housing. The upper rear edge of the housing is very close to the bracket, if it interferes file or grind the housing to make the bracket fit flush. It must fit flush to the housing. The four original bolts hold the new backing plates on put a couple in and make sure everything fits correctly. Repeat test on the other side. Brackets can also mount to the front but everything has to move from L to R including calipers or they will never bleed, bleeder up no matter which side they go on.
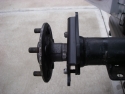
- Press the old bearings off and remove the retainer, put the new brackets on and then press the new (or old (get new ones they are cheap)) bearings on. Do not reinstall the retainer; the bracket is the retainer. Make sure the bend is inboard (toward the splines) or the brakes will not fit. Once the brackets are mounted, on the axles. Use the original bolts to reinstall the axles back into the housing.
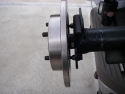
- Install the supplied centering ring and rotors using a couple of lug nuts flat side towards the rotor; they will hold the rotor on so the caliper can be fit correctly. The caliper is actually two pieces; separate them and mount the pad (support or saddle) bracket alone without the caliper or pads. It will be much easier to center it over the rotor without the caliper. There are some good pictures above. It is close, but as long at they are centered, it is fine. In some cases, due to many variations in factory parts, use the provided spacers and washers they may/will be needed. The key is to get the rotor in the center of the support bracket. Dust shields can be mounted on the inside or outside of the bracket at this time. Now is the time to install calipers and check again for clearance.
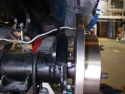
- Attach the flex line to the caliper with the banjo bolt and crush washers. Make sure the line is clear of anything that could cut it. Run the line inboard and mark the hard line so it can be trimmed. If the hard line has the correct fitting it can be looped to the soft line. The hard lines may need to be bent/cut and/or relocated to line up. Once happy with placement, a hose clamp will hold the line to the housing. At the attachment. Zip ties can also keep the line away from springs etc.
- If needed, cut, bend and double flare the hard line to go from the old drums to the newly mounted soft line. The hard line may need to be cut several inches in order to fit. Use the fitting supplied in the hardware kit to make the connection. Don’t forget to put the fitting on before you flare the line. (Yes we have forgot!)
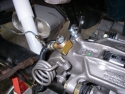
- If you have the Granada conversion on the front or any other conversion with a metering block (proportioning valve) under the MC it will need to be gutted. A Ford Racing (PN M-2450-A) will replace the shuttle valve and “gut” the prop valve. If this is not done there will not be enough pressure to the rear brakes. Make sure all the connections to the brake system are tight.
- Once everything is plumbed it is time to bleed the brakes. What we found is it was easier to take the caliper off and slide it down the rotor to get the bleeder more back than up. Or get the front of the car up higher. Try it in the original location but if there are troubles bleeding then rotate the caliper down. Bleed brakes, inspect for leaks, remove vehicle from jack stands and test brakes in a safe area. If you have a question call, we answer the phone.